Inserting and managing snippets
A snippet is a stored block of content: a paragraph, a table, an image, a formatted list or several pages. Instead of hunting text down in old documents, you insert the snippet with one click, in the right language and in the corporate design. In primedocs Desktop and the Office COM add-ins the German interface still labels snippets «Textbausteine».
There are three kinds:
- Own snippets you create yourself. Only you see them.
- Shared snippets are maintained centrally by your organisation, for example legal texts, greetings or product descriptions. They are visible to everyone or to specific groups.
- Template snippets are used by the template automatically on creation. They do not appear as selectable snippets in your snippet pane.
Applies to: Word and classic Outlook with primedocs Desktop, as well as new Outlook with the web add-in. primedocs Web itself has no snippet pane. There, snippets reach the document through the template.
- Word (COM add-in)
- Classic Outlook
- New Outlook, web add-in
Inserting a snippet
- On the primedocs tab, click Snippets. The snippet pane opens on the right with Favourites, custom and shared snippets.
- Place the cursor at the position in the document.
- Double-click the snippet, or drag it to the target position with the mouse.
Use the pane's search box to find snippets by name. If a snippet exists in several languages, primedocs inserts the version in the document language.
Creating an own snippet
- In the document, select the content that is to become the snippet: text, table, image or a mixture.
- Drag the selection into the snippet pane, into the Custom snippets area.
- In the window, enter a name, check the language and confirm with OK.
The snippet is immediately available in Word and in classic Outlook, also offline.
Inserting a snippet into an e-mail
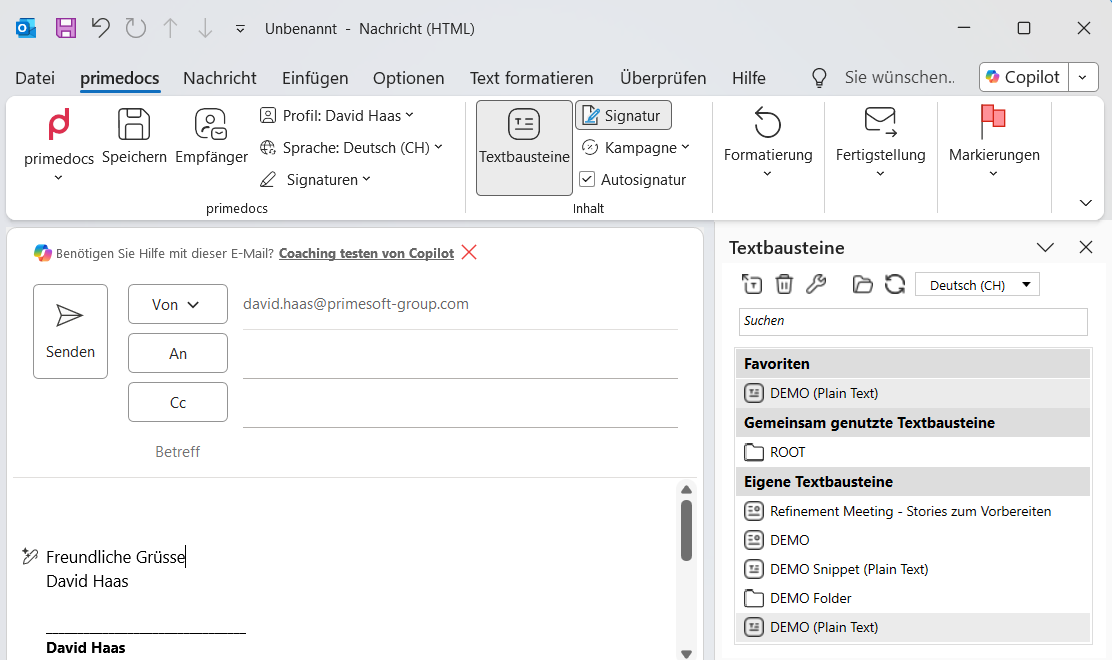
- Open a new message. On the primedocs tab, click Snippets.
- The snippet pane shows the same snippets as in Word.
- Place the cursor in the message body and double-click the snippet.
Own snippets are easiest to create in Word (Word tab). They then appear in Outlook as well.
Inserting a snippet into an e-mail
- Open a new message and click the button with the primedocs logo. The task pane opens.
- Choose Snippets in the navigation. The overview shows the areas Favorites, Shared and Private. At most one area is expanded, Shared at the start. The number in the header of an area tells you how many snippets and folders are on its top level. +… more shows all entries of an area.
- In the toolbar at the bottom of the task pane, pick the document language in which the snippets are inserted. The add-in remembers your choice.
- Click a folder to open it. The breadcrumb takes you back. The search box in the header finds snippets by name across all folders of the area.
- Place the cursor in the message body and click Insert snippet next to the snippet, or double-click the row.
The web add-in only shows snippets of the type HTML or Plain Text. If the content does not exist in the selected language, it inserts the version in the default document language, otherwise the first one available.
HTML snippets cannot be inserted into a plain-text e-mail. Set the message format in Outlook to HTML.
More actions
Right-clicking a row or clicking the button with the three dots opens the actions menu:
| Action | Effect |
|---|---|
| Insert in another language | Inserts another available language version. |
| Insert in all languages | Inserts all language versions one after another. Only available from two language versions upwards. |
| Insert as link | Disabled in e-mails. A link is only resolved during document generation and works in templates only. |
| Duplicate | Creates a copy in the same folder. Only with write permission, disabled in the favourites list. |
| Copy ID | Copies the identifier to the clipboard. |
| Mark snippet as favorite, Unmark snippet as favorite | Adds the snippet to Favorites or removes it. |
| Edit snippet, Delete snippet | Only with write permission. |
For a folder, Insert whole folder inserts all snippets of the folder including its subfolders after a confirmation. Edit folder and Delete folder are available with write permission. A deleted folder loses all of its content.
The toolbar next to the language selection also offers:
- Select multiple: tick entries and insert them together (Insert selected snippets), add them to the favourites or delete them. Only the selected snippets are inserted or marked as favourites, folders only count when deleting. Deleting requires write permission. On the overview, only the visible rows can be selected.
- Start move mode (only in an opened folder with write permission, not during a search or multi-selection): drag snippets and folders onto a folder, or onto a level in the breadcrumb to move them out of the current folder. Dropped between two rows, an entry changes its position in the order. With the keyboard: Space or Enter picks up an entry, the arrow keys move it, Space or Enter drops it, Escape cancels.
- Create folder and Create from selection (see below).
The buttons for creating, editing and moving only appear where you may write. In the Private area that is always the case.
Creating an own snippet
- In the e-mail, select the content that is to become the snippet. Images come along as long as Outlook hands out their data.
- In the toolbar, click Create from selection. The Create snippet form opens.
- On the General tab, enter a Name, and a Description and Search keywords if needed (separate several with commas).
- On the Content tab, choose the Type (HTML or Plain Text) and check the Document Language. Edit the content if needed. Take from mail selection replaces it with the current selection.
- On the Placement tab, check the Target. If you start from the overview and may write in several areas, you also choose the Area (Shared or Private). From an opened folder, the area is fixed and the current folder is preselected. Only folders with write permission can be chosen.
- Save with Create.
On the Info tab you can also store a Key and an AutoText. Templates refer to the snippet through the key, which must be unique in the data source. primedocs Desktop replaces the AutoText abbreviation with the snippet while typing. When editing, the tab also shows the ID and the History (created and modified, each with date and person).
Only snippet and system administrators see the Permissions tab. There, users and groups receive the permission Use or Edit. Only accounts that already exist in the data source are found. Without own permissions those of the parent folder apply, and private snippets have no own permissions.
Editing content in the HTML editor
You edit an HTML snippet in the editor on the Content tab, a plain-text snippet in a simple text field. The HTML editor offers the views Visual and HTML (source). The toolbar contains:
- Paragraph style: Text or heading 1 to 3
- Bold, Italic, Underline
- Bulleted list and Numbered list
- Link with the Link address
- Insert image: PNG, JPEG or GIF up to 2 MB
- Remove leading and trailing spaces and empty lines
The whole content may be at most 8 MB. When editing, the General tab shows a preview of the content, with formatting marks (¶) on request.
Languages
A snippet has two kinds of entries that exist in several languages independently of each other:
- Name, description and search keywords apply per interface language. The Language of the entries selection on the General tab switches between the languages. The overview shows the names in the interface language chosen in the settings. On creation, the snippet is created in every language for which you entered a name.
- The content applies per document language. When editing, the language selection on the Content tab shows which languages already have content. Choose an empty language and enter the content, and primedocs creates a new language version on saving.
When editing, For all languages appears next to a changed field. Use it to copy the value into the other languages: Fill the gaps only fills empty languages, Replace everywhere also overwrites existing values. The markers on the languages show where entries are missing, unsaved or cannot be saved.
If something does not work
| You see | What helps |
|---|---|
| A shared snippet is missing | Have the release for your group checked. In Word and classic Outlook, additionally synchronise, see Working offline and synchronisation. |
| The snippet appears in the wrong language | In Word and classic Outlook check the document language (Language in the ribbon), and in the web add-in the language selection in the toolbar at the bottom of the task pane. primedocs chooses the version by language. |
| Formatting looks foreign after inserting | Check the formatting of the snippet and of the target paragraph. In Word and classic Outlook select the paragraph and click Standard. Save the snippet again in Word if needed. |
| A snippet from Word is missing in the web add-in | The web add-in only shows snippets of the type HTML or Plain Text. Snippets with Word content do not appear there. |
| The buttons for creating or editing are missing | The selected folder lacks write permission. Create the snippet in the Private area or have the permission checked. |
| In the web add-in, the cursor is placed before the snippet after inserting | For snippets containing a table or a list, Outlook places the cursor before the first block. For text and paragraphs without a table or list, it is placed at the end of the inserted content. This is a known limitation of Outlook. Move the cursor behind the snippet manually. |
For advanced users
Shared snippets are created centrally and given permissions for users and groups via snippet folders. Whoever is responsible finds the guide under Snippets (layouter).