Creating a document
A template becomes a document once you have filled in the fields the template asks for: recipient, subject, date, enclosures or whatever the layouter has provided. Which fields appear is determined by the template. The examples here may differ from your templates.
Applies to: primedocs Web, primedocs Desktop. In Teams, SharePoint and CMI the primedocs Web route applies, only the filing at the end differs (see Integrations).
- primedocs Web
- primedocs Desktop
Procedure
- Open the template (see Finding templates). The template form appears, with the preview on the right.
- Check Profile and Language at the top and change them if needed. The profile supplies sender and signature, the language applies to texts and date formats in the document.
- Fill in the fields. Mandatory fields carry an asterisk and must be filled, otherwise the document cannot be created. If group navigation is set up for the template, the menu in the form header opens the desired group.
- Choose Create & Download or another output offered.
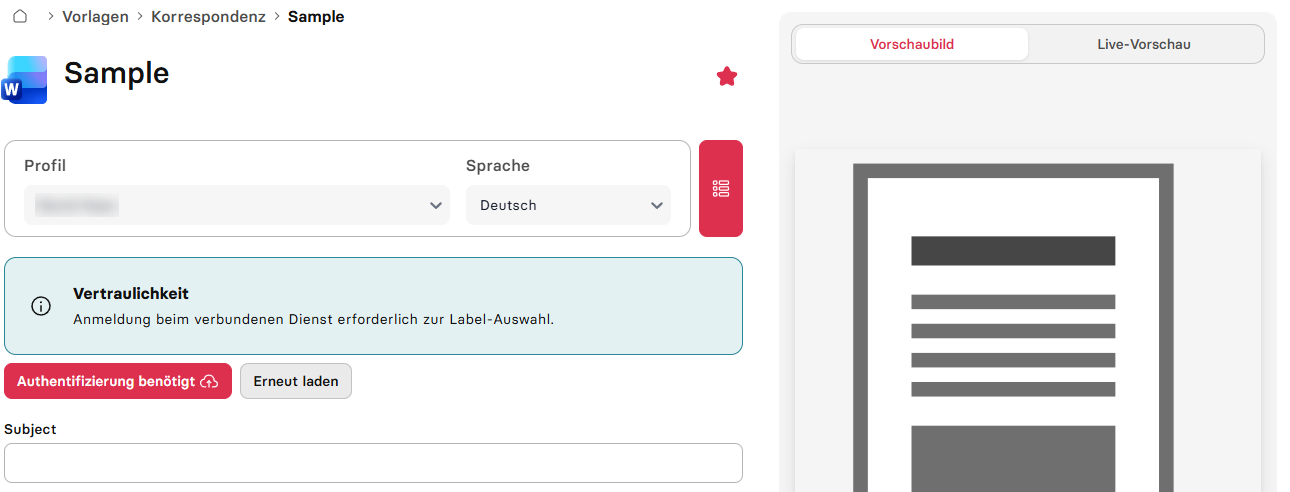
Preview
To the right of the template form is the template's preview image. For Word, Excel and PowerPoint templates you can switch to Live preview: the document is built with your entries so you can check it before output. On narrow screens a separate button opens the preview panel. There is no live preview for e-mail templates or in Connect mode.
Output
- Create & Download downloads the document to your device.
- Save to OneDrive appears if your organisation has enabled OneDrive.
- In Teams and SharePoint, primedocs files the document directly there. Started from a business system (GEVER records management system such as CMI or Fabasoft, ERP, CRM), the configured output decides whether the document is downloaded or handed to the business system. The button is named accordingly.
- Further buttons trigger actions provided by the template.
Longer creations run in the background. Under Executions (user menu) you see the status and download finished results.
Open a downloaded document in Word, Excel or PowerPoint. The primedocs tab is only available there if primedocs Desktop with the Office COM add-ins is installed.
Procedure
- On the Templates tab, first choose Profile and Document language if you have several. Both apply to the next document and can still be changed in Word later.
- Double-click the template, click New document or use the context menu.
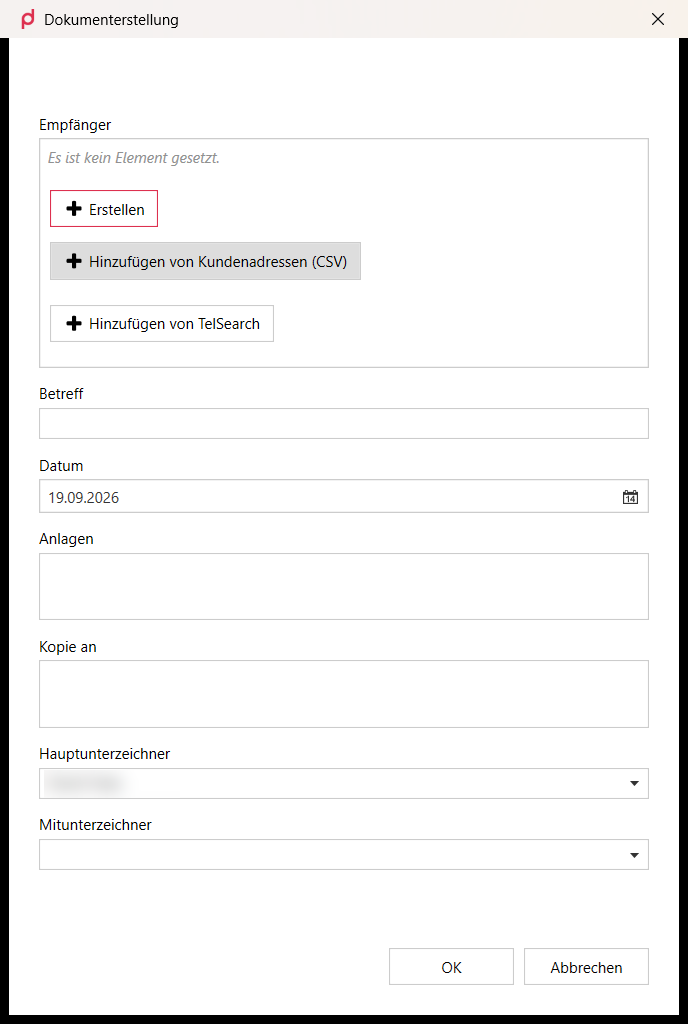
- Fill in the fields in the properties dialog. Mandatory fields are marked. The Tab key jumps from field to field.
- Confirm with OK. The document opens in the Office application with the primedocs tab.
Design colours
If your organisational unit provides several colour designs, the Design colours selection appears at the top of the properties dialog. The chosen design determines the colours and fonts of the document.
What is possible after creation
Details from the properties dialog, profile and language can be changed in Word at any time without recreating the document. See Finishing a document in Word.
Entering or selecting recipients
If the template requires a recipient, there are two ways:
- Enter manually: click Create, fill in the recipient fields and save.
- Take over from a data interface: choose the data interface (for example your organisation's address book or CRM), enter search terms, Search and add the hit. Several hits can be added together.
Entered recipients can be edited or removed via their actions. Which data interfaces are available and how the sections are named is set up by your organisation.
Choosing a sensitivity label
If the selection of a sensitivity label (Microsoft Purview) is set up for the template, the form shows the Sensitivity field. Choose the appropriate sensitivity label. primedocs applies it to the document on creation. Visible markings such as headers or watermarks are added by Office when the document is opened, based on the label. Only labels released for you are shown.
If the form requires a sign-in for this ("Authentication required"), sign in to the connected service and reload the selection with Reload. See also Settings and connected services.
Co-signature and additional profiles
If the template provides for a co-signature, a field for an additional profile appears. The choice includes profiles their owners have shared with you. Details under Profiles and deputisation.
If something does not work
| You see | What helps |
|---|---|
| The document cannot be created | Check whether mandatory fields are empty or entries invalid (the form marks them). Read the message shown, for example a required sign-in. |
| The sender in the document is wrong | Check the chosen profile and its details. Switch via Profile in Word or create again. |
| An expected field is missing | The field may be hidden depending on entries or missing in the template. Check the entries, otherwise contact the layouter or administrator. |
| "Sign-in required" on creation | A connected service needs a sign-in. Sign in and Retry. |