PowerPoint Add-In
Ribbon
A PowerPoint presentation created with primedocs shows this ribbon:

primedocs / Properties / Profile / Language: These buttons correspond exactly to those in Word.
Data
Slides: Adds a new slide to the presentation in the chosen slide layout. Each slide layout has a slide preview beside it.
Images: Access to the organisation's image library and direct insertion into the presentation. The currently selected slide determines which images are offered — different images may be available depending on the slide.
Layout
Check slide: Resets a slide back to the design specified in the slide layout. This helps with slides that have lost their alignment or contain the wrong fonts, colours, etc.
Change Layout: Switches the current slide to a different slide layout.
Design Conversion: Transfers the content of a presentation that was not created with primedocs into a new presentation in the organisation's own design (see the note at the end of the page). A dialog opens to choose the target template; Create starts the conversion.
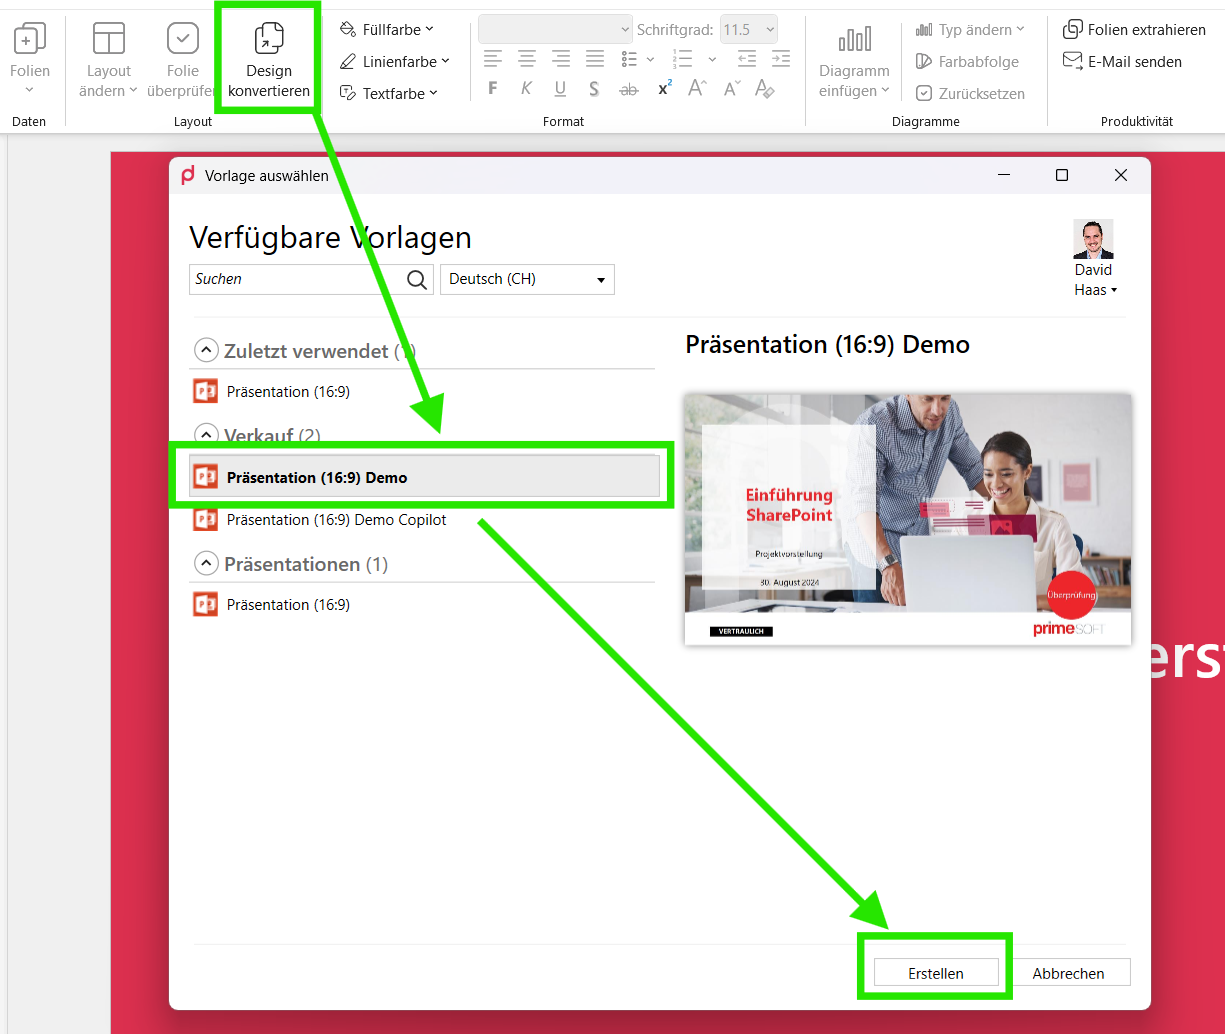
"Design Conversion": choose the target template from the available templates and start the conversion with "Create" (shown in German).
Format
Colour management: Colours for fills, lines and text — selectable separately, the same tools as in Word.
Text formatting: Standard PowerPoint text formatting buttons, reproduced here to avoid constantly switching ribbons.
Charts
Insert Chart: Inserts a chart of the chosen type. primedocs controls colours more strictly than PowerPoint.
Change type: Changes the chart type of the selected chart.
Colour sequence: Changes the colour sequence in the selected chart, within CI guidelines.
Reset: Resets the entire chart to the default values.
Productivity
Table of Contents: Creates an agenda or contents slide whose entries link to the respective slides of the presentation. A dialog opens:
- Current entries: the list of slides that appear in the table of contents. Add opens the slide selection on the right — tick the desired slides and confirm with Apply. Delete removes selected entries.
- Number entries automatically / Insert page numbers: numbers the entries and adds each slide's number.
- Create builds the agenda slide; if a table of contents already exists, the button reads Update.
Invalid links (slide no longer present) and duplicate links are detected and reported.
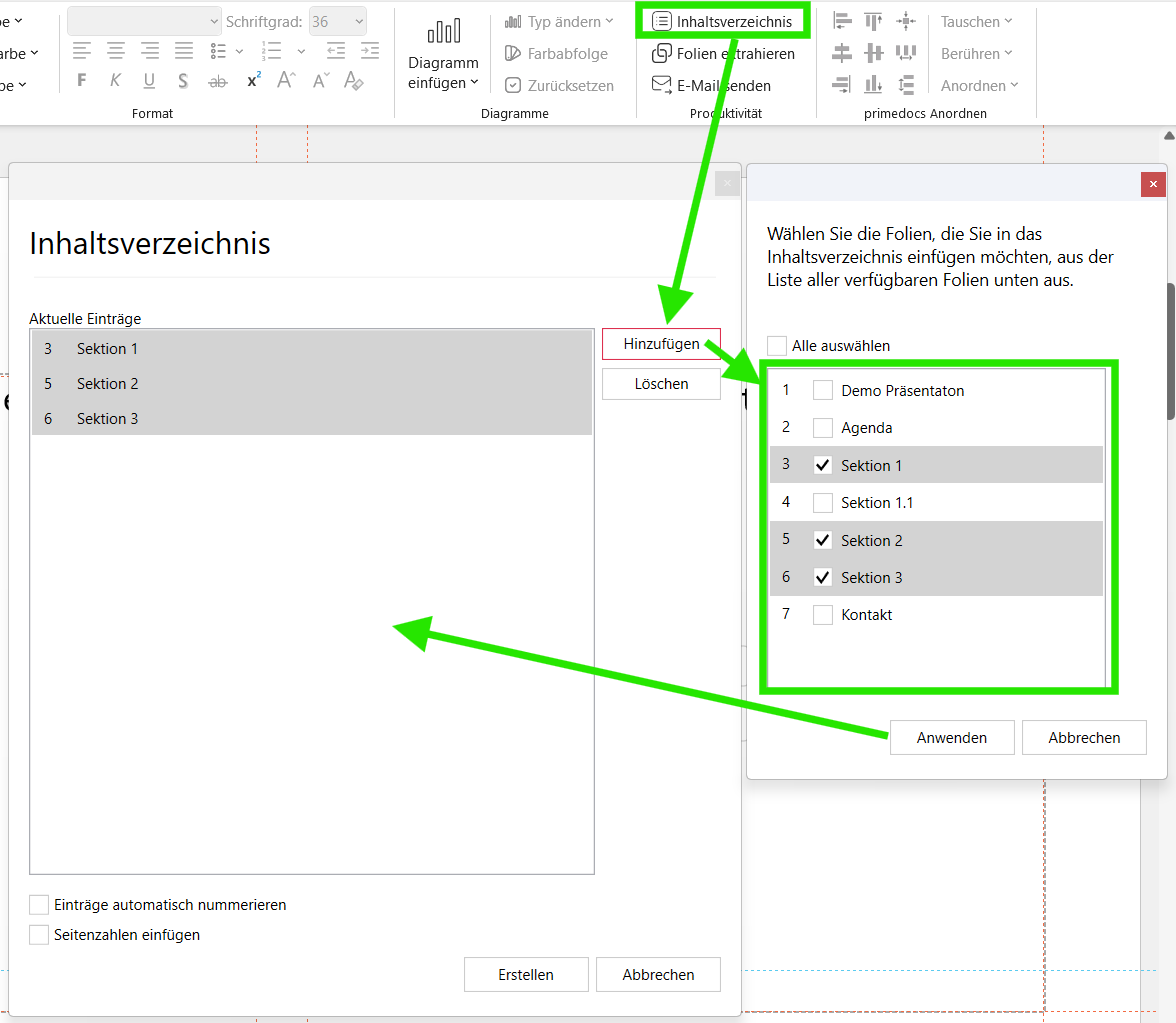
Assembling the entries: "Add" opens the slide selection (right); the chosen slides are added to "Current entries" (dialog shown in German).
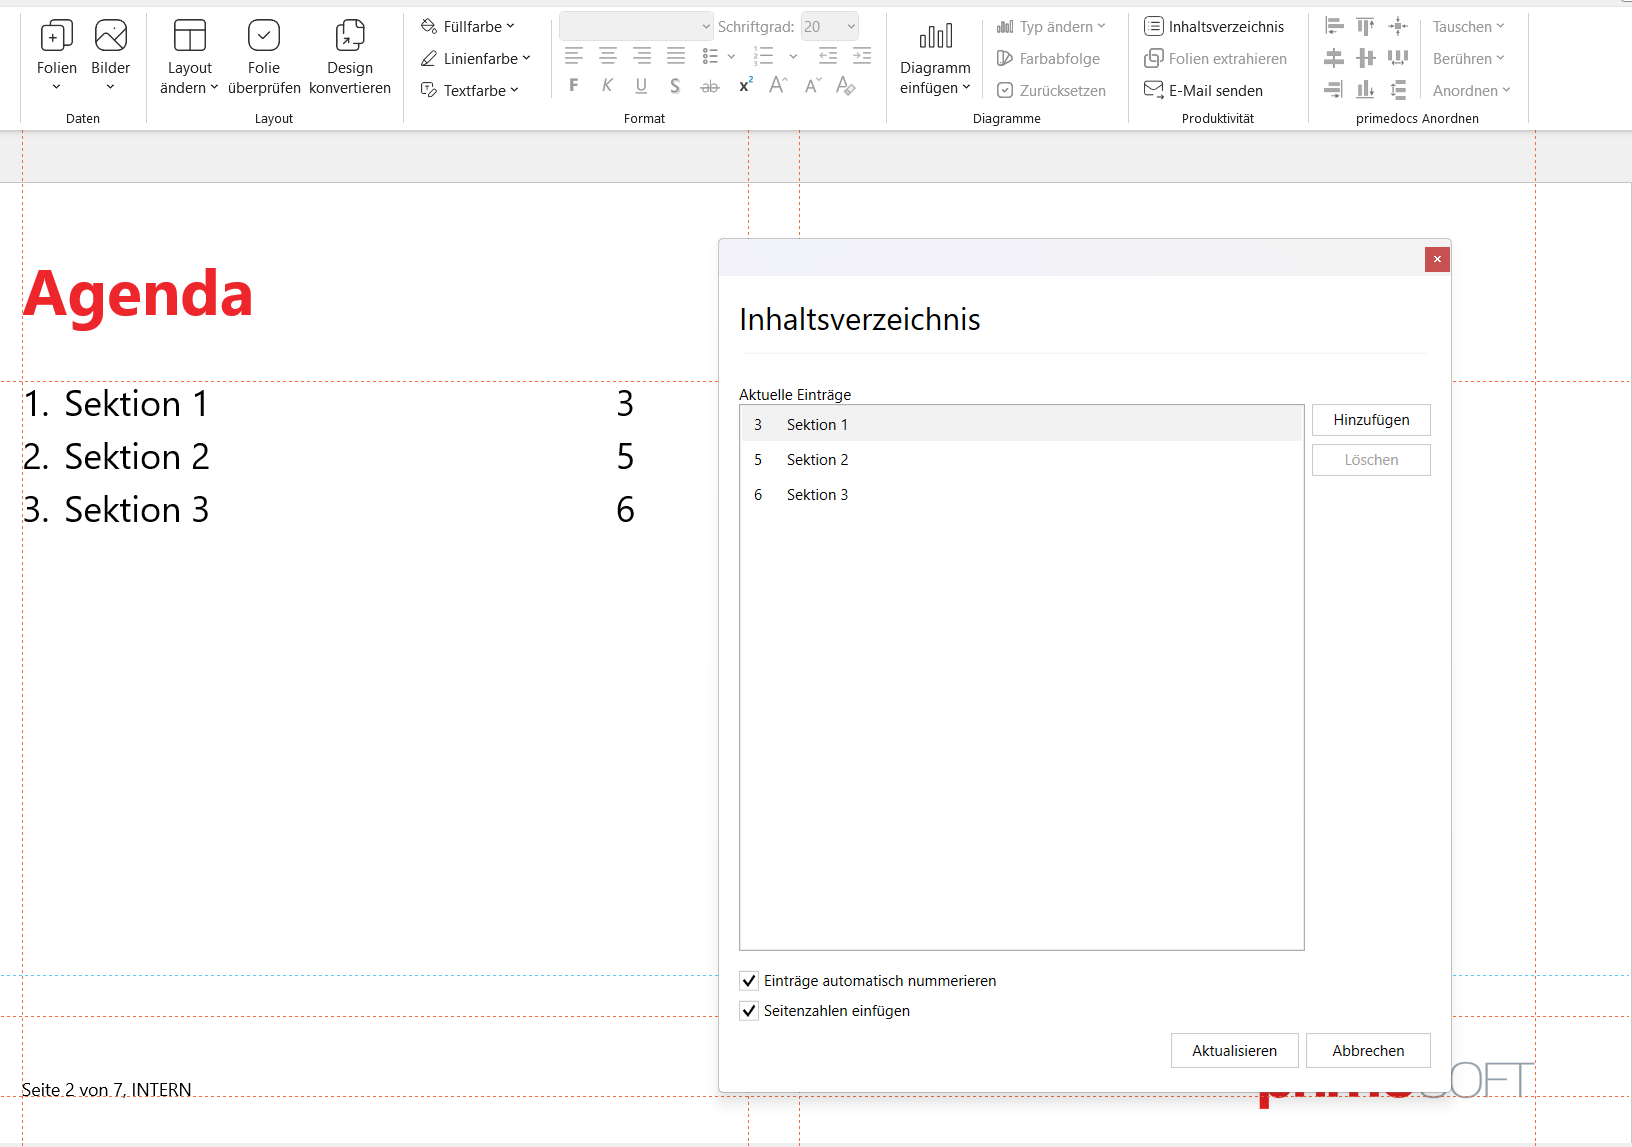
The generated agenda slide with numbering and page numbers enabled — the dialog allows an "Update" at any time (shown in German).
Extract slides: Exports the currently selected slides into a new file. The button is enabled as soon as at least one slide is selected. A dialog opens:
- Attachment type: "PowerPoint presentation" (PPTX) or "PDF document".
- Keep comments / Keep notes: available for "PowerPoint presentation" only, and not ticked when the dialog opens. Comments and notes text are therefore removed unless they are explicitly kept.
- Save opens the PowerPoint save dialog for the file name and location. Send mail hands the extracted slides straight to the e-mail sending flow (see below).
Slide formatting, animations and transitions are preserved.
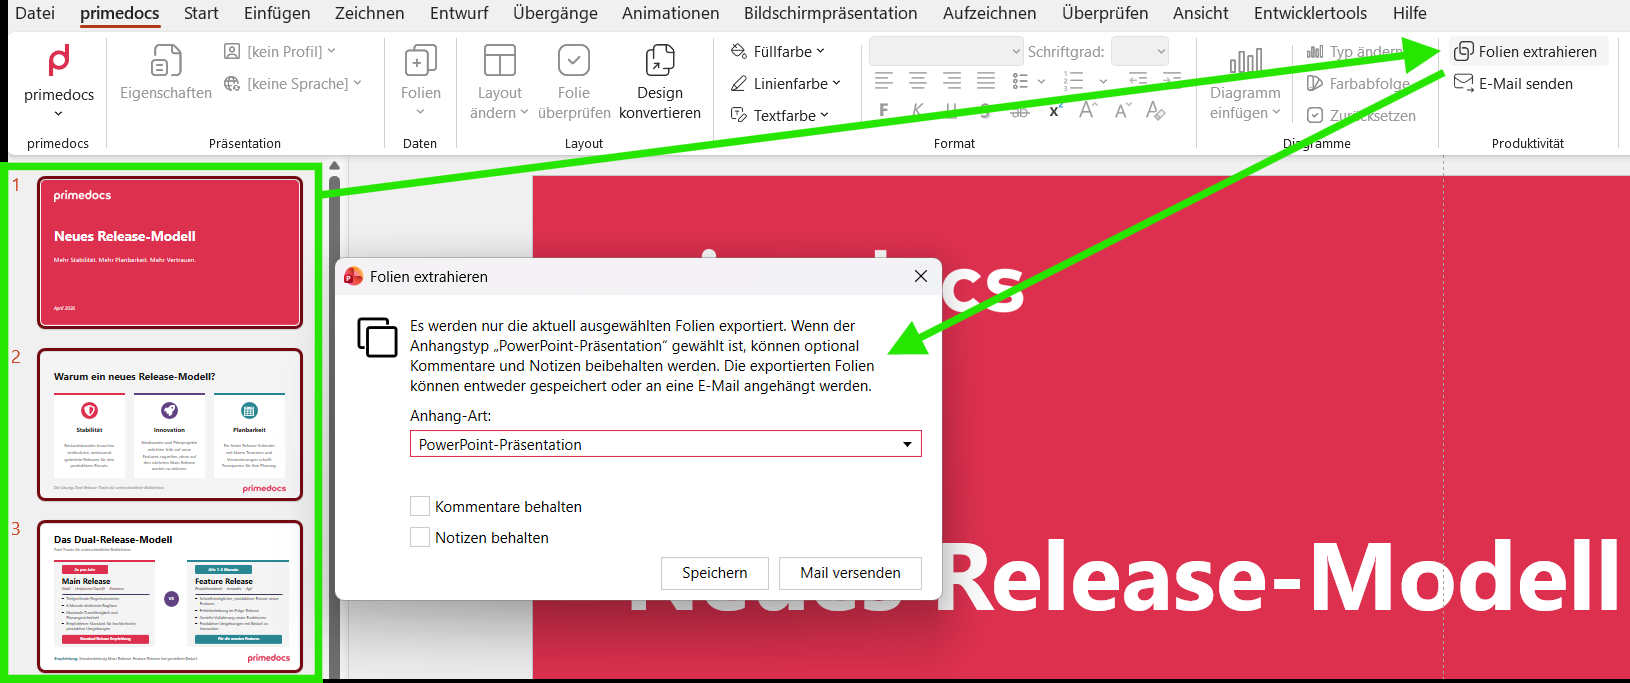
The "Extract slides" dialog: choose the attachment type and optionally keep comments and notes — then "Save" or "Send mail". It is triggered via the "Extract slides" button (top right of the ribbon).
Send mail: Creates a new e-mail with the current presentation as an attachment. A dialog opens:
- E-mail template: primedocs template for the mail ("None" can be selected); shown as soon as at least one matching template is configured. The first configured template is preselected. The template supplies layout and signature in corporate design.
- Attachment type: "PowerPoint presentation" or "PDF document".
- Subject and file name (default: "Attachment" if empty).
- Keep comments / Keep notes: for "PowerPoint presentation" only, and likewise not preselected.
If the mail is triggered from "Extract slides", the attachment type, Keep comments and Keep notes are omitted: the settings chosen there apply.
Which Outlook opens is primarily determined by the selected template. A template of type "Email (classic)" opens Outlook (Classic) with template and signature. A template of type "Email" produces an .eml file that is opened with the program registered for that file type in Windows, normally Outlook (New). If no template is selected, the Outlook variant preferred on the device determines the route.
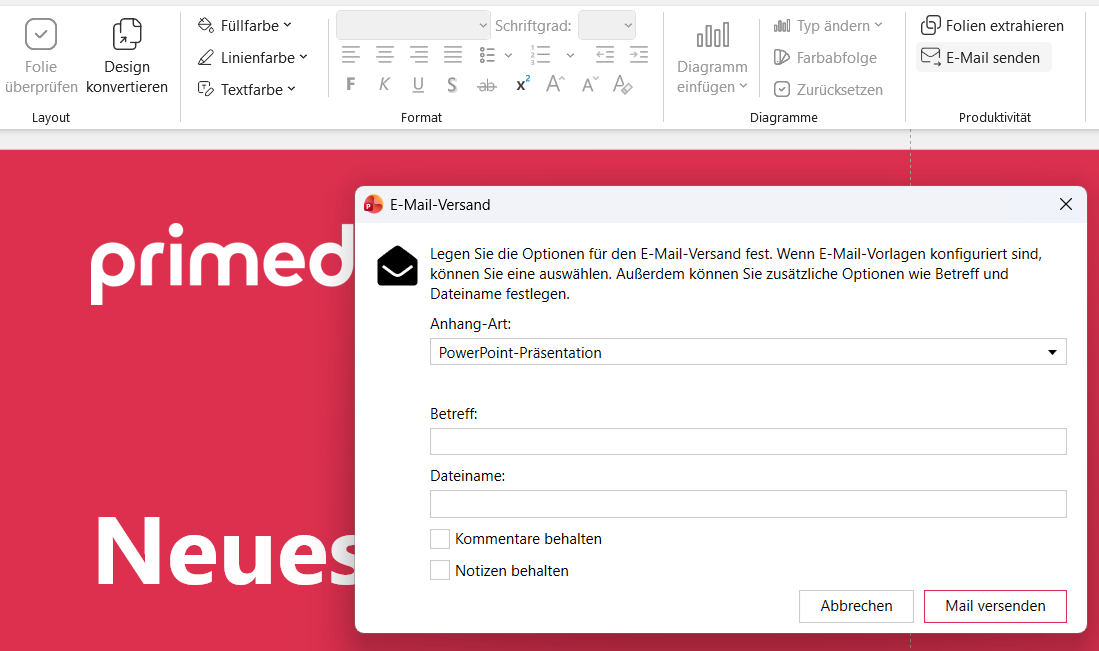
The "Send mail" dialog: set the attachment type, subject and file name, and optionally keep comments and notes.
Output: Generates the output and delivers it according to the selected configuration. The button only appears if output management is configured (see Output Management).
Transfer formatting
Use the right-click menu on a shape (or a group) to transfer formatting selectively from one object to others:
- Copy formatting: Captures the formatting of the source shape.
- Apply formatting: A submenu with three sections from which individual properties or "All …" can be applied to the selected target objects:
- Formatting: All · Font · Paragraph · Border · Line weight · Line style · Shape type
- Colour: All · Fill colour · Line colour · Text colour
- Size: All · Width · Height
This allows, for example, transferring only the colour scheme while leaving the target objects' size and position unchanged.
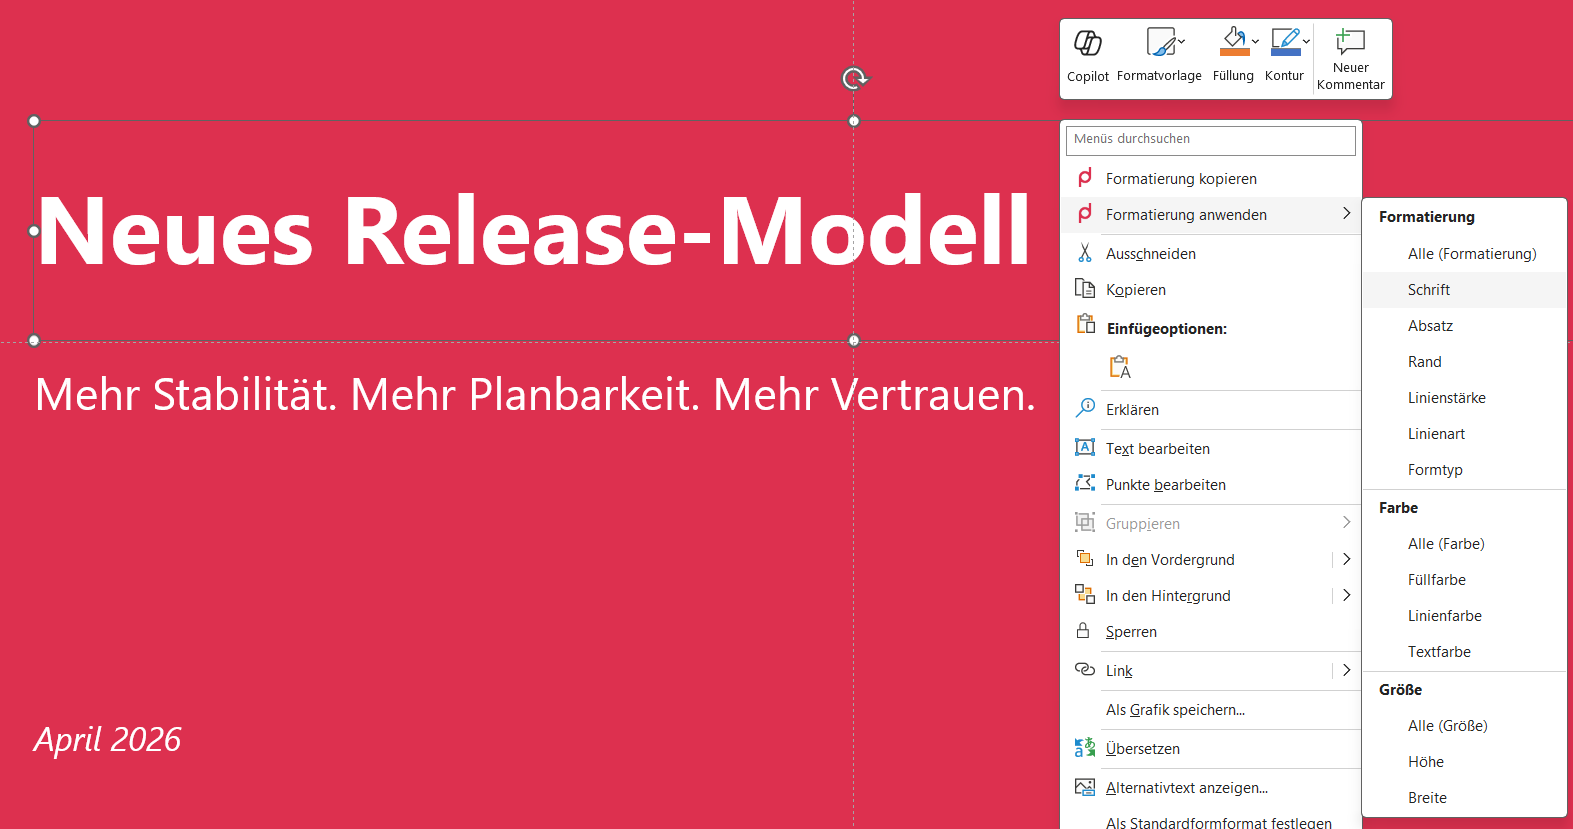
After "Copy formatting", "Apply formatting" opens the submenu with the Formatting, Colour and Size sections (menu shown in German).
Arrange
The "primedocs Arrange" group provides one-click positioning for the selected objects. The last-selected object is the reference: it stays fixed, and the other objects align to it. The buttons are greyed out while too few objects are selected or the document is protected.
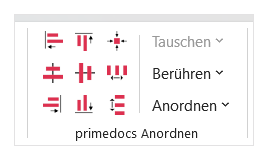
The "primedocs Arrange" group: alignment icons plus the "Swap", "Touch" and "Arrange" menus (labelled in German).
Align (2+ objects): Arrange left / right / top / bottom aligns the objects to the respective edge of the reference object. Arrange horizontally / vertically centres them on its axis. Arrange centered centres the objects on both axes (one-click centering).
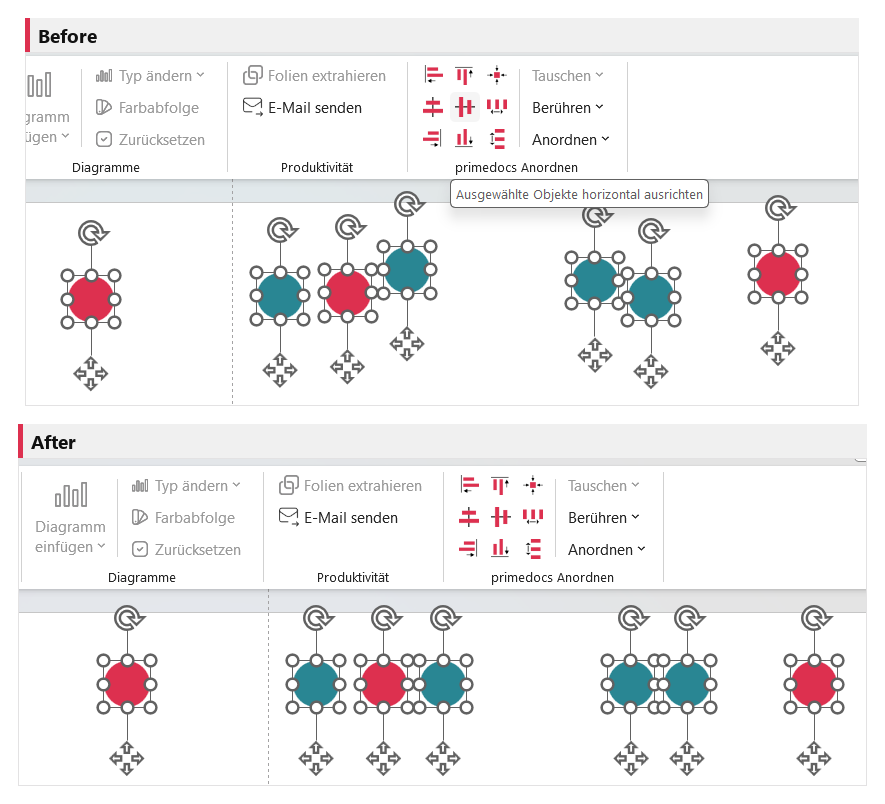
"Arrange horizontally" aligns the selected objects to the height of the reference object.
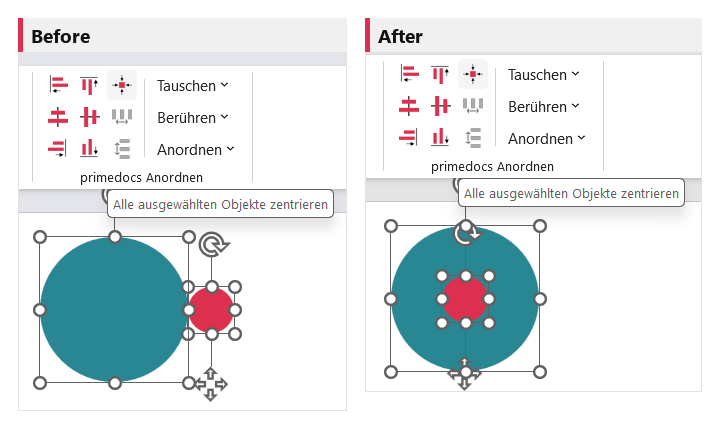
"Arrange centered" centres the objects on both axes with a single click — here the smaller object inside the larger one.
Distribute (3+ objects): Distribute horizontally / vertically evenly spaces the middle objects evenly between the two outermost ones.
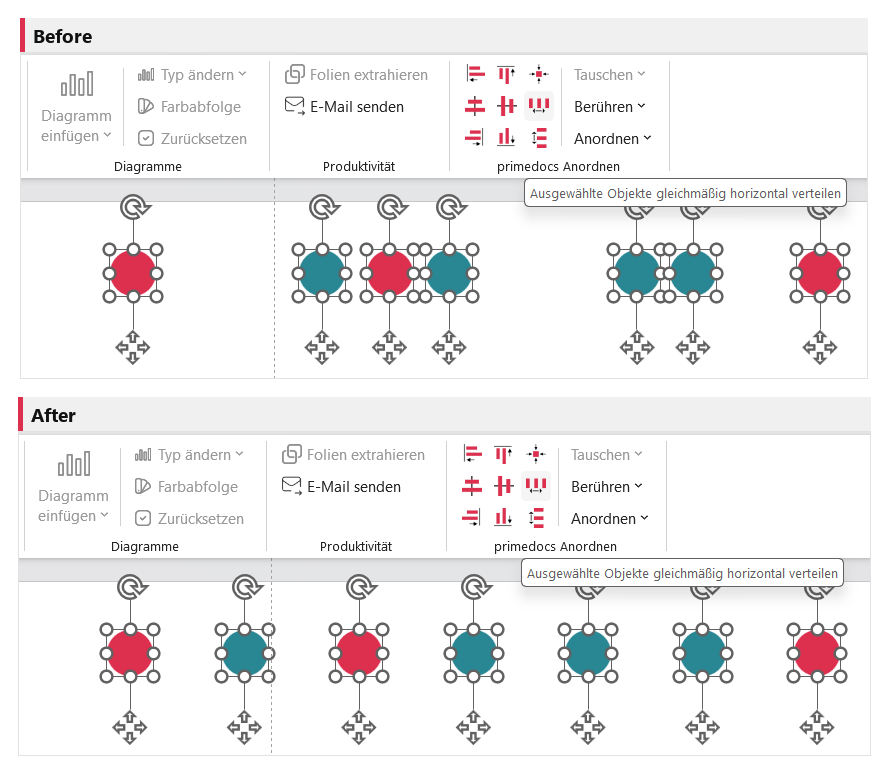
"Distribute horizontally" spaces the middle objects evenly between the two outermost ones.
Swap (exactly 2 objects): Swap horizontally / vertically / positions swaps the positions of the two objects.
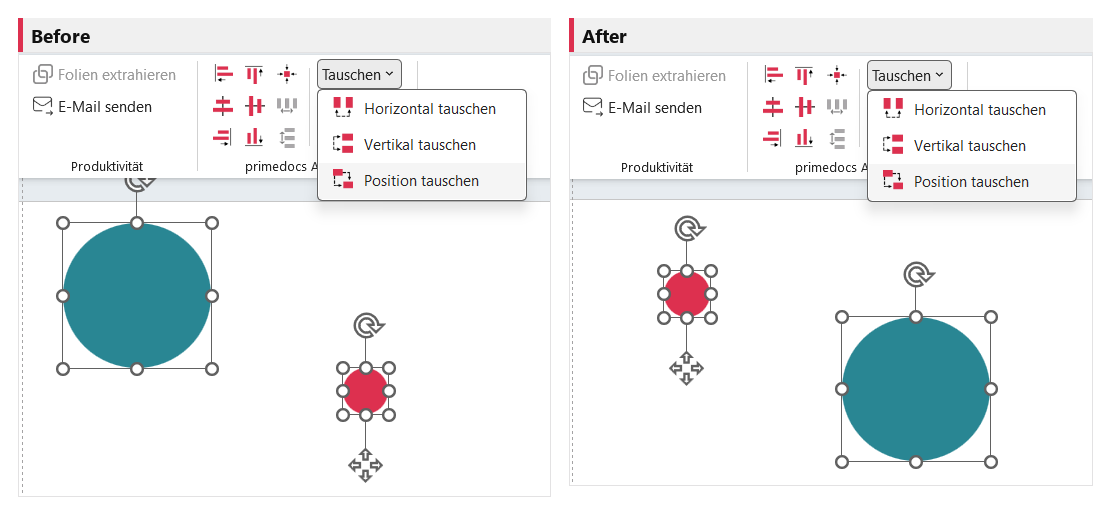
"Swap positions" swaps the positions of the two selected objects.
Touch (2+ objects): Touch below / above / left / right moves the objects so their edges touch the reference object exactly — useful for flowcharts, collages and modular layouts. Touch below right cascades the objects diagonally (offset down and to the right).
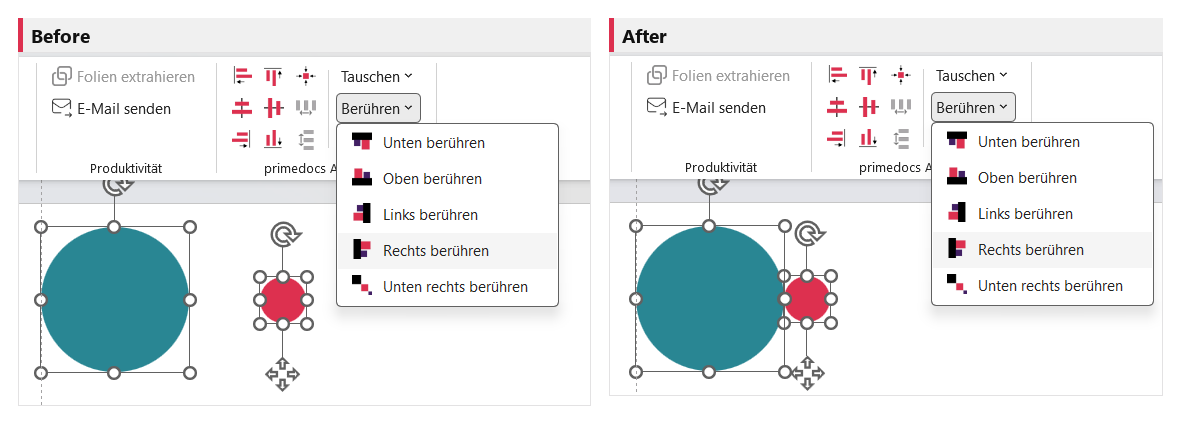
"Touch right" moves the object flush against the right edge of the reference object; the "Touch" menu offers all four edges plus "Touch below right".
Arrange menu (geometric arrangement, each centred on the slide): Arrange in matrix (dialog for rows, columns and spacing), Arrange in circle (4+ objects), Arrange in rectangle (4+ objects), Arrange in triangle (3+ objects). If the selected objects differ in size, a uniform size is suggested.
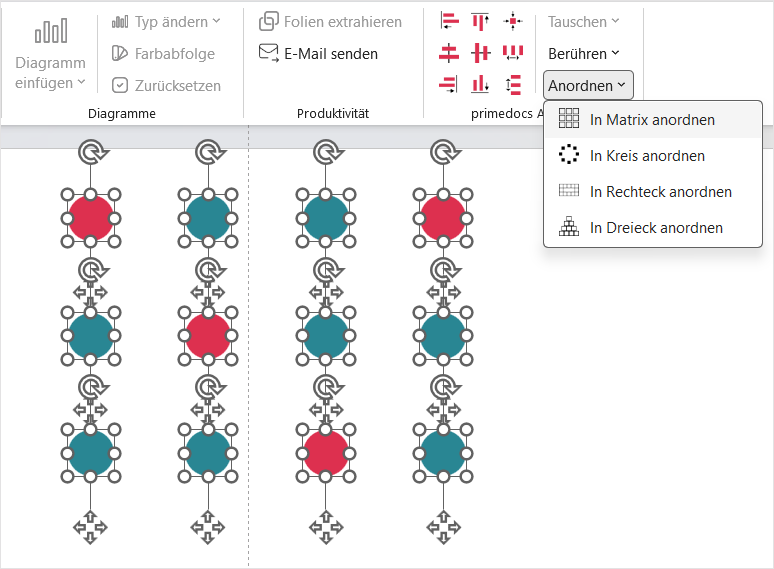
The "Arrange" menu positions the selected objects geometrically — as a matrix, circle, rectangle or triangle (shown in German).
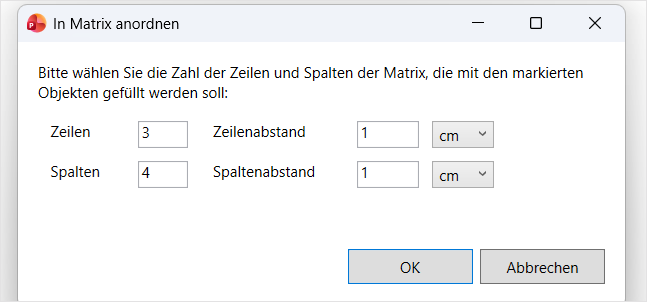
"Arrange in matrix": set the number of rows and columns and the row/column spacing (shown in German).
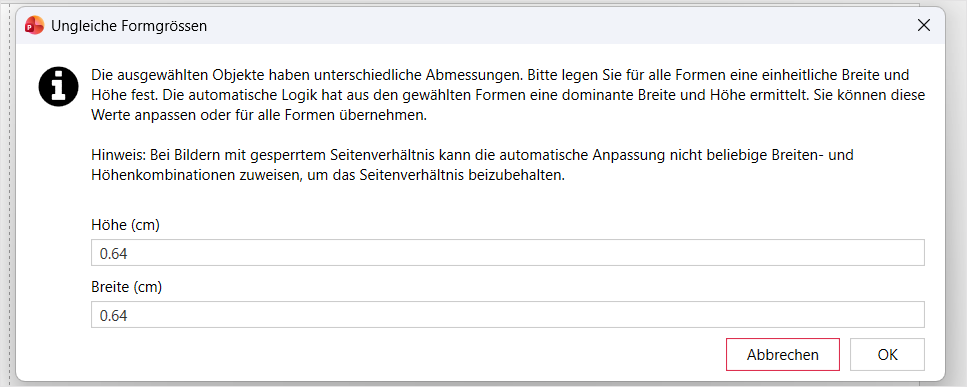
If the objects differ in size, primedocs first suggests a uniform width and height (shown in German).
For a presentation that was not created with primedocs, many buttons are greyed out. The "Design conversion" button automatically creates a new presentation in the organisation's design and transfers the slide content.