Dispatch Manager (Successor Documents)
This document function (the Dispatch Manager) activates dispatch handling for successor documents derived from a primary document — for example address labels, enclosures, or cover letters. Successor documents are produced per object (e.g. per recipient) and processed through defined targets and actions.
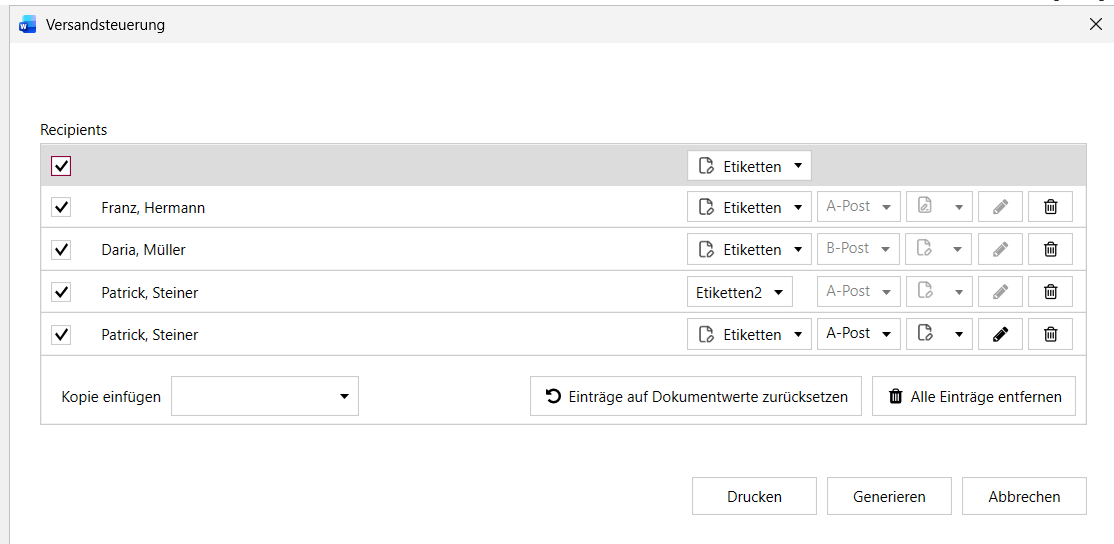
The Dispatch Manager dialog: one target per recipient (e.g. labels), processed via the actions at the bottom.
How it works
Distribution iterates over the objects the user has selected in an ObjectCollection. For each selected object, the Code of the associated Target is evaluated. This code returns the field mappings (Forms and data field values) for that successor document — the values used to populate the target template. A successor document is then generated per object; the results of a target are merged into a PDF.
The process is triggered via the actions (Actions): GenerateAction shows the Generate button in the Dispatch Manager dialog (WPF), and PrintAction shows the Print button.
When the dialog is confirmed, the assignment of targets to recipients is stored in the document itself (custom XML part) — even if nothing is generated or printed. The document can be closed and reopened, and the selection is preserved. Cancelling the dialog stores nothing.
When the dialog is opened again, the stored list is restored and replaces the values of the ObjectCollection; only when no stored data exists is the list built from the ObjectCollection. A target that no longer exists in the configuration is restored as "no target".
The Dispatch Manager is available only in the primedocs Desktop Client together with the Word COM add-in (legacy, Windows). There is no equivalent in the Office Web Add-ins or in primedocs Web. Shipped from version 4.1.10020.0.
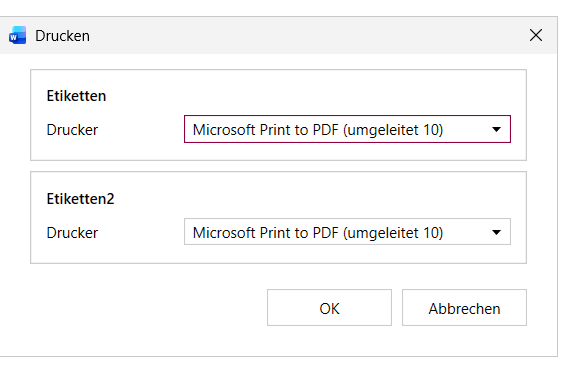
PrintAction lets you set a printer per target — «Print» opens the printer selection per dispatch document type.
Basic structure
<SuccessorDocumentConfiguration>
  <DistributeByObject>
    <Targets>
      <Target Name="Label" Label="Address label" Icon="Tag">
        <TagFilter>
          <Tag>label</Tag>
        </TagFilter>
        <Code>
          function main() { return $("RecipientId"); }
        </Code>
      </Target>
    </Targets>
    <Actions>
      <PrintAction Enabled="true">
        <Default TargetName="Label" Printer="LabelPrinter" Tray="Tray2" />
      </PrintAction>
      <GenerateAction Enabled="true" />
    </Actions>
  </DistributeByObject>
</SuccessorDocumentConfiguration>
DistributeByObject
Controls the distribution of successor documents per object and contains the two areas Targets (which successor documents) and Actions (what happens with them).
Targets
Defines the available targets (successor document types).
| Element / Attribute | Required | Description |
|---|---|---|
Target | – | A single target. Multiple targets are allowed. |
Target/@Name | yes | Unique identifier of the target; referenced from the actions via TargetName. |
Target/@Label / @translate-Label | optional | Display name or translation key of the target. |
Target/@Icon | optional | Icon for the user interface. |
Target/TagFilter/Tag | in practice yes | Restricts the target to templates carrying the given tags. Multiple Tag entries are allowed. The schema permits a target without a TagFilter, but such a target is skipped at runtime. |
Target/Code | yes | JavaScript that returns the distribution value per object. |
GlobalTargets/@Key | optional | Reference to a global target definition instead of an inline Target. |
Actions
Defines what happens with the generated successor documents.
| Element / Attribute | Description |
|---|---|
PrintAction/@Enabled | Enables the print action and the Print button in the Dispatch Manager dialog (default: true). |
PrintAction/Default/@TargetName | References the target to print via its Name. |
PrintAction/Default/@Printer / @Tray | Optional printer and paper tray. |
GenerateAction/@Enabled | Enables the generate action and the Generate button in the Dispatch Manager dialog (default: true). |
GlobalActions/@Key | Reference to a global actions definition. |
Targets and actions can be maintained centrally as a global configuration via GlobalTargets / GlobalActions and reused across multiple templates.
Output
The Generate button always writes the resulting files to the folder <Downloads>\primedocs. If the folder does not exist, it is created; once generation has finished, the folder is opened in File Explorer automatically.
- File name:
{TargetName}_{yyyyMMddHHmmss}.pdf— the target name comes fromTarget/@Name, followed by the timestamp of the generation. - Format: always PDF. No other output format (for example DOCX) is available.
- Bundling: one file per target, regardless of the number of recipients. Five recipients for the target "Label" produce a single PDF with five pages.
Location, file name and format are not configurable — the schema of the document function has no element or attribute for them. For controlled storage in GEVER, SharePoint or on a network share, use output management or Connect. Both act on the generated primary document, however, not on the successor documents of the Dispatch Manager.
The TagFilter of a target must match exactly one Word template in the language of the document. If it matches none or several templates, that target is skipped without any message; the same applies to a target with no TagFilter at all and to a target whose name no longer exists in the configuration. Generation still reports success, but the PDF for that target is simply missing. Choose tags and document languages so that resolution is always unambiguous.
Printing
The Print button opens the printer selection, with one printer and one tray drop-down per selected target. The only configurable settings are PrintAction/@Enabled (default: true) and, per target, a Default entry with @TargetName, @Printer and @Tray.
Everything else is fixed: the number of copies is set to 1. The print job sets no options beyond printer and paper tray — duplex, paper format and colour follow the printer driver's own defaults and can be controlled neither from the template nor from the dialog.
Default only provides the initial valueThe printer is resolved in three stages: first the remembered user selection, then PrintAction/Default, and finally the Windows default printer (or the first available printer if none is marked as the default). The configured default therefore applies only until the user has confirmed a selection of their own — from the first user selection onwards it is overridden permanently. The remembered selection is held in the user's Desktop Client settings and cannot be controlled through the organisational unit or the user profile.