Set up your user profile
A profile is the combination of your personal user data and the data of an organisational unit. Every document you create is generated through a profile: it defines who the document is "from" and which organisational context it belongs to.
Users and profiles
Every primedocs user can have one or more profiles:
- User: your personal account, linked to your Active Directory or Entra ID identity. There is exactly one user account per person. The user fields are synchronised automatically from the directory.
- Profile: attached to your user account and linked to an organisational unit (department, team, etc.). A profile is created automatically when you first use primedocs.
Setting up a profile
After the setup wizard, you are on the Organisation tab. Click Profiles on the left: your automatically created profile is displayed.
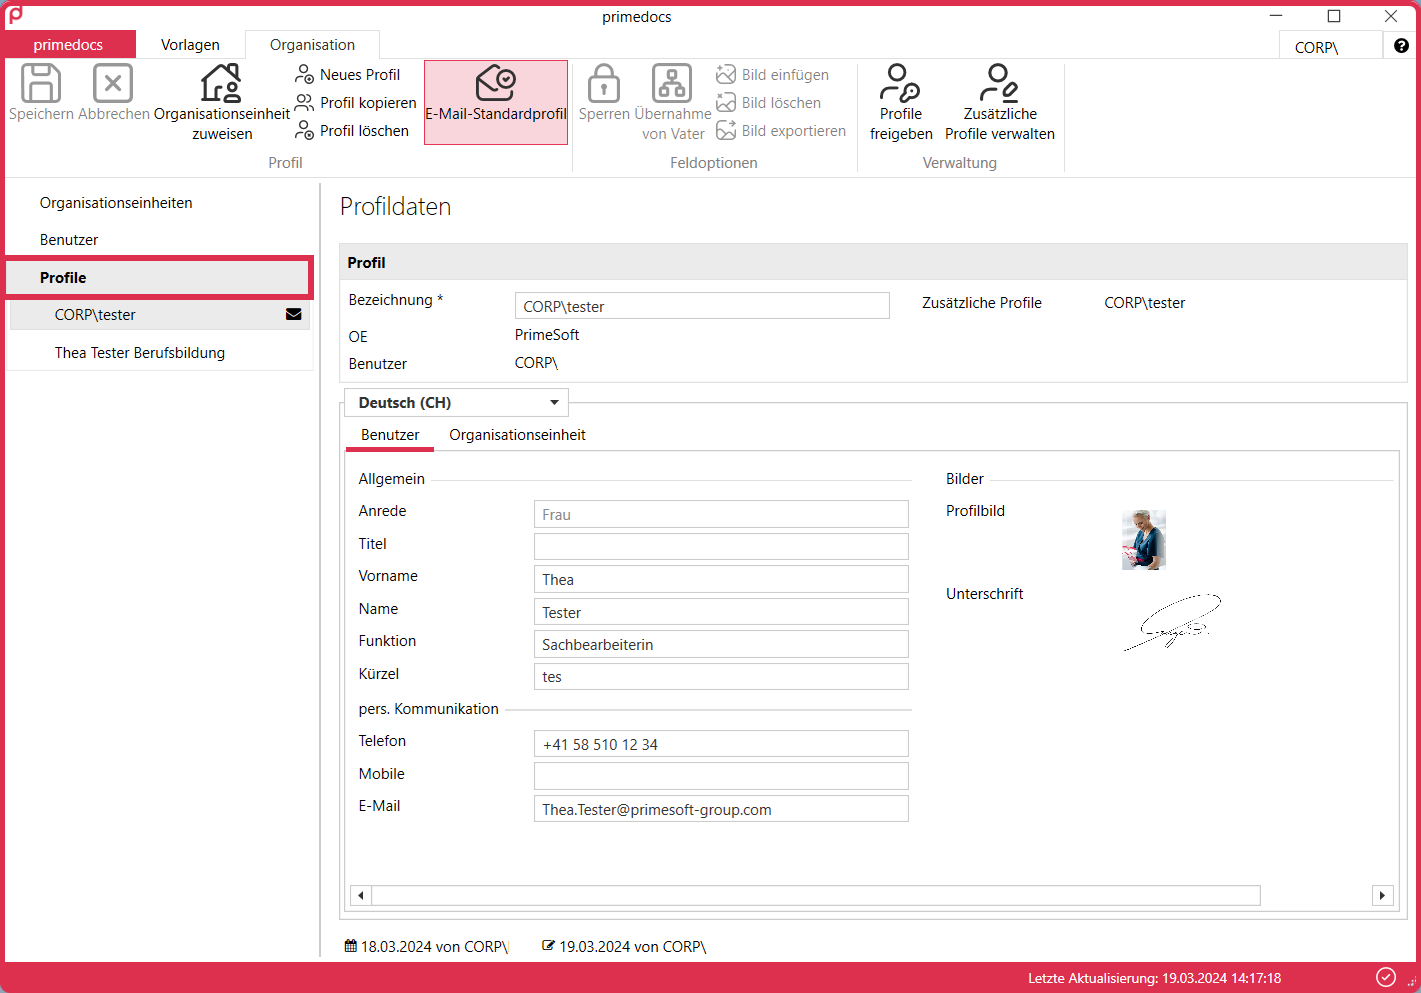
Renaming a profile
Click in the Description field and replace the automatically inserted user name with a meaningful description. We recommend including your name or initials (e.g. "PMuster: Main profile"). This matters later if you share the profile for deputisation. Then click Save.
Checking profile fields
Check that all fields are filled in correctly, and complete any missing details directly in the available fields. Then save.
Profile fields are divided into two categories:
- User fields: personal data such as first name, last name, title, phone number, and email. They can only be changed in the User area.
- Organisational fields: data from the linked organisational unit, such as company name, department, address, and logo. You do not change these directly, but via the Assign organisational unit button.
If you have manually changed a user field, the text in it is shown in black instead of dark grey. Manually adjusted fields are no longer overwritten automatically. To repopulate a field with the directory data, click in the field and then click Inherit from parent.
Creating an additional profile
If you hold several functions in your organisation, you can create additional profiles. Proceed as follows:
- Click Copy profile. The current profile is duplicated.
- Assign a new description (e.g. "Simon Küttel: SIBE").
- Adjust the title and other relevant fields (e.g. phone, email).
- Assign a different organisational unit if required.
- Click Save.
Setting a default profile
If you have several profiles, one is marked with an envelope icon as the default profile: it is used when you do not select another profile. To make another profile the default, select it and click Email default profile in the ribbon. Then save.
The Email default profile sets the default profile for the desktop client's email templates. The default profile for web email templates is set in primedocs Web.
Images in the profile
The profile picture and the signature normally come from your user data and are taken over by each of your profiles. On an individual profile you can deviate from this — for example for a functional mailbox or a departmental signature that is meant to have no signature image.
In addition to raster formats (e.g. PNG, JPG), vector graphics (SVG) are also supported. They stay razor-sharp at any size and in print; for older Office versions a raster image is embedded automatically as a fallback.
In primedocs Web
Open the profile via your name in the top right and Users & Profiles. An image field has three states:
Synchronized — the image comes from your user data. A chain icon in the top right of the image field indicates this; its hint states that the content is inherited from the user settings and names the language concerned. Changes to your user data still affect the profile.
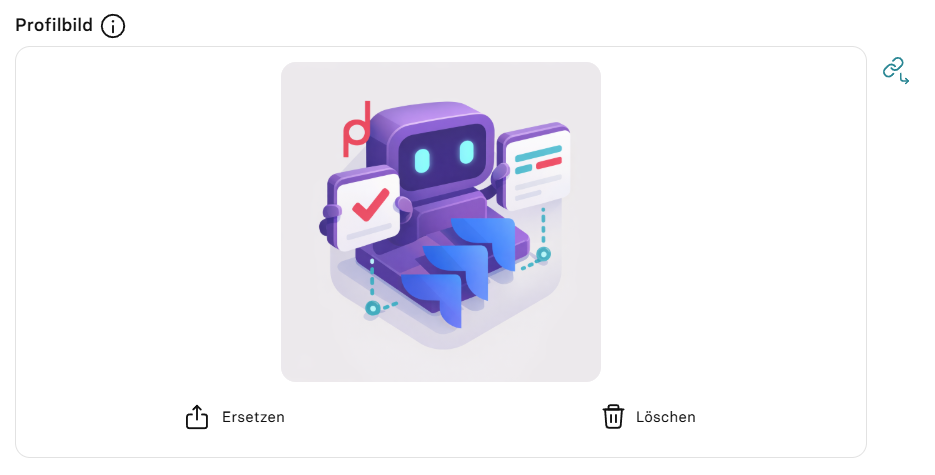
Own image — use Replace to store an image for this profile only. It overrides the image from your user data.
Deliberately empty — use Delete to remove the image for this profile. After saving, the profile has no image, even if one is stored in your user data.

Use the Synchronize icon in the top right of the image field to undo your own setting — whether an own image or deliberately empty — so that the image from your user data applies again. As long as a change has not been saved, Undo appears instead.
Changes only take effect once you click Save.
In primedocs Desktop
The Insert image, Delete image, and Export image buttons can only be clicked when an image field is selected (e.g. Signature or Profile picture, where available). To fill an image field with the value from your user data again, click into the field and then on Inherit from parent.
Sharing a profile (deputisation)
With Share profile, you share a profile with another person so that they can create documents in your name or use your profile as a second signature. Typically, you add a person and grant them the right to assume your identity in correspondence: this corresponds to full deputisation.
For each person, you define the permissions:
- Co-signing: whether your profile may be used as a second signature, with or without your signature image.
- Correspondence: whether the person may create documents in your name ("on behalf" or fully assuming your identity).
- Profile editing: whether the person may edit your profile (data fields, signatures, organizational unit). Without this option, the share is read-only.
The three permissions are independent of each other: profile editing only allows editing. Whether the person may also use your profile for documents is determined by co-signing and correspondence.
Sharing transfers the profile data into the document cleanly and completely, and keeps the deputisation traceable. This is more reliable than adjusting the details by hand in the Word document.
Setting sharing permissions
Open Share profile for your own profile in primedocs Desktop. In the permissions dialog, use Add to add the required person, then select that person in the list. Set Co-signing, Correspondence and Profile editing separately and confirm with OK.
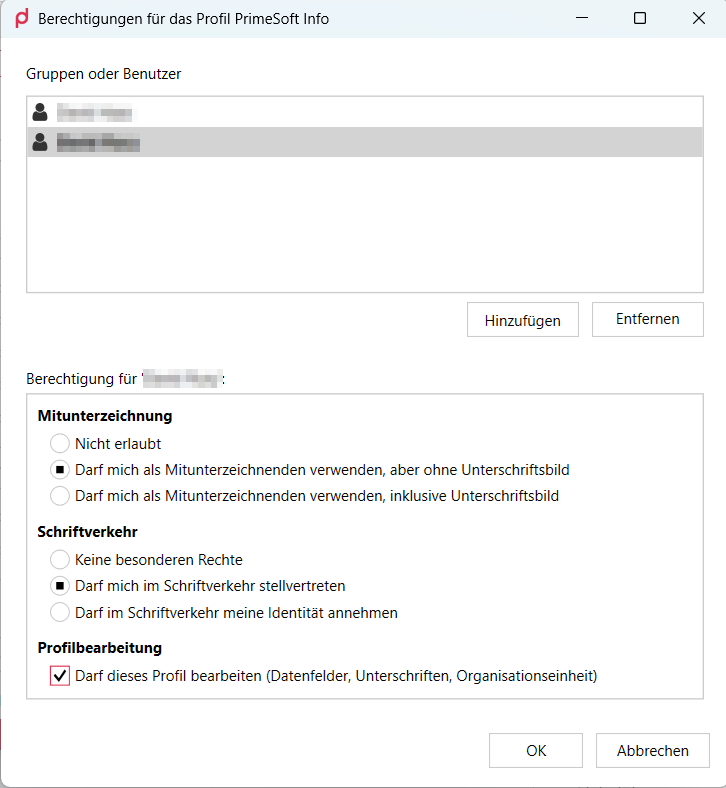
The selected person may co-sign without a signature image, act as a deputy in correspondence and edit the profile. These are example permissions, not a required combination.
Editing shared profiles
If a profile has been shared with you with editing rights, it appears in your profile list with a hint naming the owner ("Profile of …"). In primedocs Desktop, you can maintain it there like one of your own profiles, for example, update data fields or signature images. In this release, primedocs Web opens shared profiles read-only. Deleting, re-sharing and setting it as the default profile remain reserved for the owner.
Organisation unit of a shared profile
When editing another person's profile with write access, only organisation units available to the profile owner can be assigned. Your own organisation unit permissions do not extend this selection. In primedocs Desktop, assigning an organisation unit to another person's profile requires a connection to the primedocs server. It is not available in offline mode.
In the primedocs Desktop sharing dialog, grant write access with “May edit this profile (data fields, signatures, organization unit)”. In the Web Admin, select “Read & write” instead of “Read-only”. Write access is a separate permission alongside correspondence and co-signature use.
Managing additional profiles
Via Manage additional profiles, you choose which of the profiles shared with you are selectable and in which order they appear for selection.
Switching profiles
The active profile determines which data appears in newly generated documents.
- In primedocs Web, select the profile in the template form. In the Office Web Add-In, use the profile selection for the current template or signature. The user menu opens profile management.
- In primedocs Desktop, use the button with the profile picture and description in the Templates tab, or the Organisation tab.